#JavaScript30 Journey

Documenting my progress through the 30 day vanilla JS coding challenge

day 1
Day 1 - JavaScript Drum Kit

The main topic I learned from this lesson was working with audio tags and using JS to play the files. With audio tags, you're able to use .play() to play the file and work with .currentTime to specify where to start playing the audio. In addition, this lesson works with adding event listeners to the window to watch out for keydown events of specific letters to play the audio, as well as cause certain CSS changes to highlight the key pressed on the page.

Completed: Nov 22, 2020
Posted: Dec 5, 2020

day 2
Day 2 - JS and CSS Clock

Once the hands of the clock are set up, this lesson focuses on using the current time to determine where the hour, minute, and second hand should go. In order to do this, I learned to use the CSS transform by rotating the hand based on the respective hour, minute, or second it is. Once the function to complete this is written, a setInterval is used to grab the new time every second, so the clock updates every second. Working with dates/time has always been difficult, but this lesson wasn’t too bad. Also, this lesson teaches about cubic-bezier, which is the animation effect of the tick-tock.

Completed: Nov 23, 2020
Posted: Dec 5, 2020

day 3
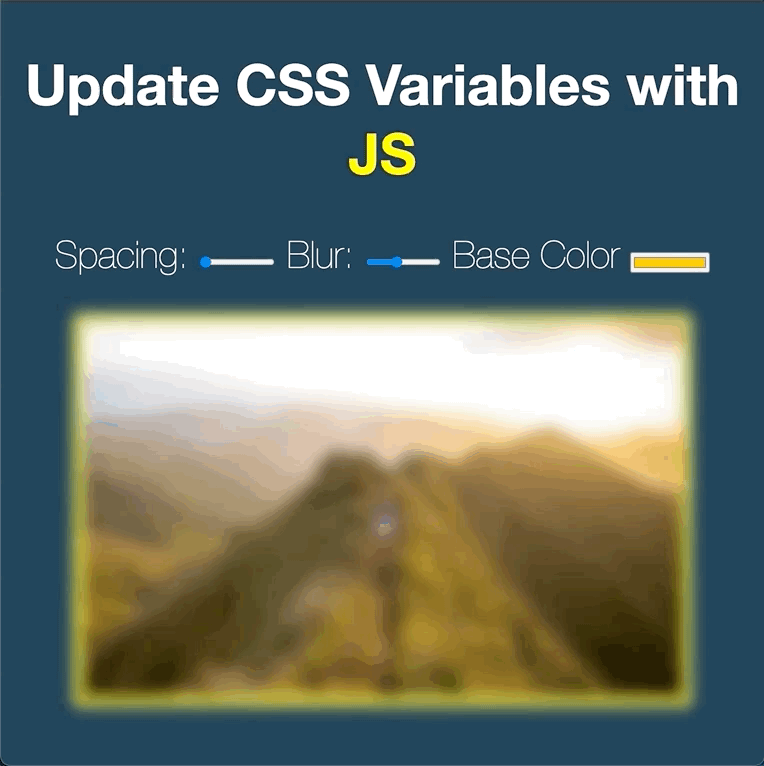
Day 3 - CSS Variables

CSS variables are great tools that can be used to manipulate the styling of a page using JavaScript. This lesson focuses on the syntax of variables, using two dashes before the variable name (i.e. —base) and using var() to access the value in other areas (i.e. background-color: var(—base);). For this lesson, the goal was to use sliders on the page to alter the spacing, blur, and border color of an image. Adding event listeners to the sliders and setting the style property with specific syntax is practiced in this lesson to give it the functionality. This lesson also introduces to dataset attributes in the HTML tags, which can be accessed using JavaScript (i.e. data-sizing=‘px’ can be accessed with JS using .dataset.sizing). For more info, please see my detailed blog.

Completed: Nov 24, 2020
Posted: Dec 5, 2020

day 4
Day 4 - Array Cardio Day 1

While this day focused heavily on using array methods, there was still so much to learn. For most of these array methods, I already feel pretty comfortable with (such as .filter(), .map(), .sort(), and .reduce()). However, this lesson goes into different scenarios where it might be a little tougher to complete the exercise. For example, sorting an array of people by last name where the array of names is a string listed like ‘lastName, firstName.’ The best way to work with this would be to split the string and focus on the last name and sort it afterwards. The lesson also goes through an interesting way to reduce an array of words by adding the instances of each word. The key to this would be to start the accumulator as an empty object and work with it as an object.

Completed: Nov 25, 2020
Posted: Dec 5, 2020

day 5
Day 5 - Flex Panel Gallery

CSS has always been something the I struggle with and this lesson really tested me on it. In order to get the animation effect, a lot of adjustments were needed to center the words on the page and to create flex grids for each respective word. Once established, a transform: translateY style is added to the top and bottom word so it does not show on the page. However once clicked, JavaScript is used to listen to the event to add the .open-active class, which will re-style the transform: translateY so it animates and shows on the page again. With this, the panel will have an animated panel expansion as well, which uses flex to reshape the panel.

Completed: Nov 26, 2020
Posted: Dec 5, 2020

day 6
Day 6 - Type Ahead

This was a functionality I really wanted to include in my final project. While I was looking for resources in React to implement this, this lesson was to complete it in full JavaScript. Once an array of objects of cities have been fetched, event listeners are added to the input to listen for value typed in by the user. As the user types each letter, a new RegExp object is used to search through the array of any matches to the input for both the city or the state. Once these matches are found, these are displayed as a list using CSS.

Completed: Nov 27, 2020
Posted: Dec 5, 2020

day 7
Day 7 - Array Cardio Day 2

Another cardio day, another review of array methods. I’m pretty familiar with these methods as well, but two that I always forget about are .some() (which confirms if one value is true for a certain conditional) and .every() (which confirms if all values in the array are true for a certain conditional).

Completed: Nov 28, 2020
Posted: Dec 5, 2020

day 8
Day 8 - Fun with HTML5 Canvas

I’ve only worked with HTML canvas when working with Chart.js for my fourth project at Flatiron. Having no experience with it prior, I didn’t fully understand how it worked. With this lesson, I finally understand some of the technical aspects of it, such as setting a context for the canvas in order to create something on it. With context, so much can be used to create the paint-like brush above (such as using .strokeStyle, .lineJoin, .lineCap, etc.) All of these work together with event listeners with the mouse to create the effect it does. In order to make the multicolor design, the css function hsl() was used (which stands for hue- saturation-lightness) in combination with JavaScript event listeners to change the values of the attribute. I’ll definitely be practicing this as there’s still so much to learn with this.

Completed: Nov 29, 2020
Posted: Dec 6, 2020

day 9
Day 9 - Dev Tools Tricks

Through my coding journey so far, I’ve only used console.log() to log messages in the console. It wasn’t until this lesson where I found out there are so many other methods you can use in the JavaScript console. For whatever reason someone might use these, they’re pretty cool ways to use the JavaScript console, especially when warning users and showing errors in the console. My favorite would have to be console.table() to create readable tables of arrays and objects.

Completed: Nov 30, 2020
Posted: Dec 6, 2020

day 10
Day 10 - Hold Shift and Check Checkboxes

Outside of the array cardio days, this lesson was one I felt pretty comfortable with. Before tackling this one, I played around with GMail’s checkbox features to try to emulate the same functionality. At first, I had the window listen for a keydown of shift, but this lesson teaches that the click event has a .shiftKey with equates true or false on if the shift key is being pushed. Also, reference variables would be needed in order for the page to remember which checkbox was last clicked on and if that box was either checked or unchecked. That way for the next click, it was create the same functionality for that box and everything else in between.

Completed: Dec 1, 2020
Posted: Dec 6, 2020

day 11
Day 11 - Custom HTML5 Video Player

This was another fun one to play around with since we’re using another media tag. Just like with the audio tag in the first lesson, this lesson focuses on the video tag, adding a volume control and speed sliders, along with a video scrubbing and time skips for the video itself. For the volume slider, I knew that that where the pointer ended on the slider would determine the percentage volume, but I had to learn about .currentTime and .duration for the video tag to calculate it. This would work exactly the same for the scrub bar, but using a combination of mouse events to determine where the user is at on the bar. The other features were pretty simple once I learned more about what was available to the video tag (such as .play() and .pause() to play and pause the video, as well as .paused to determine if the video is paused.).

Completed: Dec 2, 2020
Posted: Dec 6, 2020

day 12
Day 12 - Key Sequence Detection

Growing up, the Konami Code was something that was memorized in my household. It was so important to get those extra 30 lives for Contra, or else you’ll never have a chance to beat the game. Regardless, I never did, but this code will be engraved in my brain for the rest of my life. For this lesson, it knew that the window would have an event listener for the keydowns of each key. What I learned from the lesson was how to store that information and to look for the EXACT order of the keydowns. The secret code would be stored in the script and each keydown would be pushed into an array. This array would always have at most the same amount of keys as the secret code. After each key down, this array would be compared to the secret code (using a .join() since two arrays cannot equal each other). If they match, then something will happen! While we don’t get extra lives by entering the code here, we do get a nice surprise.

Completed: Dec 3, 2020
Posted: Dec 6, 2020

day 13
Day 13 - Slide in on Scroll

This was a fun exercise the practiced with detecting where the page was at with scrolling. While the lesson already came with a finished function for debounce(), it was an important concept to learn about. Since the event listener is detecting the scrolling on the page, it can fire many times while a user is scrolling. The purpose of the debounce method is to limit the number of times it listens for the event, thus assisting with page performance. While added the classes to the images to animate the slide-in feature, determining the point at which they slide in was the difficulty. This lesson also uses a combination of .scrollY, .innerHeight, .height, and .offsetTop to determine where certain aspects are located, such as halfway through the image, bottom of the image, and to determine whether the image is half shown or if the user scrolled past the image.

Completed: Dec 4, 2020
Posted: Dec 6, 2020

day 14
Day 14 - JavaScript - Reference VS Copy

References vs copying is always so confusing when it comes to JavaScript. Sometimes we want to manipulate something, but not alter the original, yet it still does. Why? It depends on which one you are trying to change. When it comes to strings, numbers, and booleans, these changes are usually fine. When it comes to arrays, it gets a little more confusing as it creates references. Meaning, making changes to one array will affect the other. There are numerous ways to make a copy of an array (i.e. using .slice(), .concat(), or using the spread operator. The same issues arise with objects, which also has number ways to make a copy (i.e Object.assign() and the spread operator). One thing to note that these copies only go one level deep. Meaning that if an array is an array of arrays or an object is an object with objects, the sub-arrays & sub-objects will be references and will also both the copy and the original sub-arrays & sub-objects.

Completed: Dec 5, 2020
Posted: Dec 6, 2020

day 15
Day 15 - LocalStorage and Event Delegation

I’ve briefly used localStorage during dev bootcamp, mostly to handle user authentication and store JSON web tokens to persist log ins. However, there’s so much more to it with persist all sorts of data. With this lesson, we are creating a tapas list with a checkbox for done (which is similar to creating a to-do list). Creating the to-do list using the form on the pages is fairly simple, using forms and input, type checkbox. What we are trying to persist is the list, or array, of tapas names and whether or not they’re done. LocalStorage is a set of key/value pairs and has it has functions like .getItem(key) and .setItem(key, value) to utilize. However, the values in localStorage can only be strings. So in order to store arrays/objects as strings, we’d use JSON.stringify() to store & JSON.parse() to pull the items from localStorage. With storing the state of the checkbox, we would add the event listener to the ul tag itself because the li tags in the list is constantly changing. With that, you can use attributes (such as index) in the HTML tags to access the item in the items array, make the change to “done” and re-store the data to localStorage.

Completed: Dec 6, 2020
Posted: Dec 6, 2020

day 16
Day 16 - Mouse Move Shadow

This lesson focuses on a fun CSS trick that listens for a mouse move event and extends multiple shadows. The first part of this lesson teaches about offsetX & and offsetY properties of the mouse move event. We’ve used these properties in the past, however this lesson shows that the values depend on where the mouse is hovering. Meaning, the values depend on if it’s hovering over an element’s children, regardless if the event listener was only placed on the parent. In order to account for this, we would just need to add e.offSetX (X-Coordinate of mouse) to e.target.offsetLeft (to determine the X-Coordinate on the child), which equals the X-Coordinate on the window. The same is down with e.offsetY & e.target.offsetTop to get the Y-Coordinate. As for the shadow itself, we would need to set a parameter of how far we want the shadow to go. Once we do that, we would do a little bit of math to determine the extension, depending on where the mouse is. Once calculated, a text shadow style would be applied to the text, flipping the x and y values around while also making them negative when switched.

Completed: Dec 7, 2020
Posted: Dec 7, 2020

day 17
Day 17 - Sort Without Articles

Today’s lesson wasn’t too bad as it wants us to sort the list of bands provided, ignoring any articles at the beginning of the name (i.e. “A”, “An”, and “The”). I was able to sort the list as needed, but the method I used was a little convoluted to get the job done. While I used string splitting to check the first word against an array of articles, this lesson uses RegEx to insensitively (disregards upper case vs lower case characters) at the start of each string and using .sort() to sort the band names as needed.

Completed: Dec 8, 2020
Posted: Dec 8, 2020

day 18
Day 18 - Adding Up Times with Reduce

The purpose of this lesson is to be able to pull strings of video times to calculate the total number time it takes to play all the videos using reduce. We’re given some list items where there is a time data-set attribute on each one (view the elements to see them as they’re listed as data-time=“4:04”). After pulling all the lis with the data-time attribute using querySelectorAll, we have to work with this as an array either by using the spread operator into an array or using Array.from(). From this point on, it was easy to map out the time strings, covert them in to workable integers to calculate the total time. One thing I learned to make life a bit easier after watching this lesson was to use ES6 destructuring when splitting the video string and using .map(parseFloat) to convert them to workable integers.

Completed: Dec 9, 2020
Posted: Dec 9, 2020

day 19
Day 19 - Webcam Fun

Whew! I learned a lot with this lesson. It’s another lesson working with the canvas, as well as with a webcam. First off, I learned that in order to work with a webcam, we need a secure server (https:// or localhost) due to security reasons. Once configured, the lesson goes over navigator.mediaDevices.getUserMedia() in order to pull from the webcam. One part where I got stuck was that the lesson goes over converting that into a URL to use as the live stream src for the video tag, however that has since been deprecated. Instead, you’d assign the srcObject to the stream, which got this to work! From there, the stream can be “painted” to the canvas using (.drawImage()) along with the ‘canplay’ event listener on the video, pulling from the stream whenever the a function is called when clicking on “Take Photo.” It creates a base64, a text version of the actual photo. We can then use this to create a downloadable link, that will download the image to the local. To go even further, the lesson works with the pixels on the image on the canvas to create pretty cool effects. It teaches how to reach the array that returns when pulling .getImageData() and how to adjust the pixels using .putImageData(). It’s pretty fun to play around with!

Completed: Dec 10, 2020
Posted: Dec 10, 2020

day 20
Day 20 - Speech Detection

It’s pretty cool that speech recognition exists without the need for libraries or frameworks as they live on top of the browser. To work with this, we would need to create a new instance of SpeechRecognition in the script and set the interim results as true (to display the words as we are saying them, where as false will display when the user stops speaking). To pull the speech data, we’d add an event listener to the recognition instance, listening for the result. Within this event, there are results, which houses a speech recognition results list, where a transcript is nested inside and an isFinal boolean, which indicates if the user stopped speaking. The transcript can then be used to pull the full speech from the user, creating it into an array and joining them together. Once a user stops speaking, the recognition will need to start again in order to listen again. Therefore we would need to add an event listener for the end of speech recognition, so it can start again. Adding the transcript to the DOM is easy by appending p tags and changing the inner text to the transcript, but you can do a lot of fun stuff like adding special events if the user says something specific. Try saying “babushka” and see what happens!

Completed: Dec 15, 2020
Posted: Dec 15, 2020

day 21
Day 21 - Geolocation

This lesson focuses on what’s available with geolocation, which is more than longitude and latitude as it also includes a speedometer. Outside of coding, we were able to dabble with Xcode (iPhone Developer tool) as well as Safari developer tools to check out the console for the Safari page we are working with in Xcode. In order to grab this information, we listen for the user’s position using navigator.geolocation.watchPosition(), to watch the user’s position over time. There’s a .geolocation.getPosition(), but that only gives the user’s location at that moment in time. With Xcode, we can simulate movement of a user and from the event of .watchPosition(), we have timestamps, accuracy (measured in meters), heading (number of degrees relative to north), latitude, longitude, & speed (in km/h). Using these values, we can rotate the compass based on the heading and add the textContent of speed. watchPosition() also handles error handling in the event where the user decides not to share their location.

Completed: Dec 16, 2020
Posted: Dec 16, 2020

day 22
Day 22 - Follow Along Link Highlighter

This lesson was inspired by Stripe’s pretty cool nav bar that has seamless transitions when hovering each link, which we will eventually get to. As a more simplified version, this lesson focuses on creating highlights over certain links all around the page. In order to create the highlight, the span with some CSS is added over each element when the mouse is hovering over it. In order to get the correct coordinates of the link, we’d use .getBoundingClientRect() to get the x & y coordinates, as well as the sizes to apply to the highlight span to show up on the link or word. Once applied, we would need to account for the user scrolling on the page as it would mess with where the span would go. In order to compensate, we would need to add the values of window.scrollX and window.scrollY to the values of the coords.left and coords.top.

Completed: Dec 17, 2020
Posted: Dec 17, 2020

day 23
Day 23 - Speech Synthesis

This lesson plays around with the text to voice feature that is available on most modern browsers, playing with the voice type, changing the rate, changing the pitch, and being able to customize what the voice will say. The message that is read is created under a new SpeechSynthesisUtterance(), taken from the text area box. Then, that message is passed through SpeechSynthesis.speak() once there is a voice attached. To grab the voices, an event listener called “voiceschanged” is added onto SpeechSynthesis. We use this instead of pageload because we would need to way for SpeechSynthesis to load in order to populate the voices available. With the SpeechSynthesisUtterace, you’re able to set .voice, .rate, and .pitch to change those values. Using basic querySelectors and adding proper eventListeners, these are easy to change by setting them. Lastly, speechSynthesis also has .cancel() to stop the voice from speaking, which can be added to the stop button.

Completed: Dec 21, 2020
Posted: Dec 21, 2020

day 24
Day 24 - Sticky Nav

This lesson is pretty cool because so far, I’ve mostly use templates to help me stylize my navigation bar on my applications. For today, I learned how to have the nav bar stick to the top of the window once it reaches there, as well as do some fun things once it gets there. To do this, we would need to see where the top of the nav bar is located on the window and make the nav fixed when window.scrollY is greater than equal to the top of the nav, we can add a class and CSS styling to fix the position to help us. When fixing the position, the rest of the document will take up the space where the nav bar used to be (since fixing it to the top will cause it to no longer take up space). To adjust for this, we would need to offset the amount by adding padding that is equal to the offsetHeight of the nav, then removing it when it’s no longer fixed to the top. When adding classes, it’s best to add them to the body so if any other changes need to happen when the nav bar is fixed, we can use it to change other elements as well, such as animating a logo or zooming into the document.

Completed: Dec 22, 2020
Posted: Dec 22, 2020

day 25
Day 25 - Event Capture, Propagation, Bubbling and Once

This lesson was a very informative one because we’ve been using a lot of event listeners, but this one focuses on adding event listeners to nest divs. Basically, clicking on the inner-most nested div means we’d be clicking on all the divs that surround it as well, triggering clicks to the top of document. This is called bubbling! What actually happens is that when a user clicks, JS “captures” the click from the top down (going from the top most of the document down to the most nested div), then it “bubbles” back up to fire the event that was added. There’s an optional third parameter to add to event listeners where adding {capture: true} will cause the event to fire during the capture down instead. To prevent the bubbling up of the event, we can add e.stopPropagation() within the function to log the one event that’s needed. Within the optional third parameter. there’s a property called “once,” where if it is set to true, then the event will only fire once and then unbind (aka remove the event). Super helpful!

Completed: Dec 21, 2020
Posted: Dec 21, 2020

day 26
Day 26 - Stripe Follow Along Nav

This lesson is a continuation of a previous lesson regarding an animated and dynamic navigation bar. Most of the effort is in adding and removing classes based on the mouse enter and leave events, but a lot of structure was already provided to us in order to prepare for the lesson. The HTML was built in a way the uses nested lists for each nav link (meaning the parent list’s line items each have their own lists which display would should be included in the nav link). For the classes, the display and the opacity are altered based on which nav link should be active. Most of the work is working with the background of the nav links to changed based on the content. We, again, use .getBoundingClientRect() to get coordinates as well as the height and width of the content as well as info for the nav bar itself in the event the nav bar moves, using those coordinates to offset the spacing.

Completed: Dec 29, 2020
Posted: Dec 29, 2020

day 27
Day 27 - Click and Drag

There are many JS libraries that include the capabilities for click, drag, and drop. While this lesson omits the drop options, it’s cool to see all the working parts in vanilla JS. The action on the slider is dependent on the various mouse events and taking the amount of scroll from left to right and shifting the div by the same amount to have the sliding effect. The slide effect is only happening when the mouse is down, so a variable would be needed to indicate true when the mouse is down, otherwise if the mouse leaves the div area or the mouse is up, then the variable would indicate false. The mousemove event is what tells us about the sliding feature and we only want to take into account when the mouse is down. With the mousedown event, we would grab were the mouse is on the div using event.pageX and subtracting where the div is at on the page using offsetLeft. In this event, we’d also take note of where the slider is at with the scrollLeft and store that in a variable as well. Within the mousemove event, we would use figure out how much scrolling has happened and then apply that onto the slider scroll.

Completed: Dec 30, 2020
Posted: Dec 30, 2020

day 28
Day 28 - Video Speed Controller

It’s the return of the Big Buck Bunny and another quick lesson working with the media player. It works with a scrubber that will change the speed of the video based on the mousemove event on it, giving it more of a DJ feel. To get the measurement of where the mouse is at on the scrub bar and to give it the percent, we grab the y-coordinates using e.pageY - this.offsetTop, mainly because this will give the most accurate location of the coordinate if there was padding involved. We then convert that to a percentage amount by dividing the y-coordinate by the height of the bar using .offsetHeight and apply that styling to the speedbar to get the animation. Then we would set a min speed and a max speed for the video and use those values to calculate the playback rate of the video. We can then apply that value to the video itself using video.playbackRate.

Completed: Jan 4, 2021
Posted: Jan 4, 2021

day 29
Day 29 - Countdown Timer

This lesson creates a pretty useful timer when needing to quick countdown timers with a visual representation of the countdown as well as the time of when to actually return. First thought would be use setInterval for the countdown itself, but that comes with challenges when clicking away from the browser as well as using iOS. Instead, we would get the time now using Date.now(), which obtains the time in milliseconds, then add the number of seconds we are counting down to get the stop time. Here is where we can use setInterval to figure out how much time is left on the clock by determining seconds left using the stop time and subtracting the current time. Then, we’d use a separate function to display the time remaining because setInterval doesn’t take into account the first second when displaying just inside the setInterval. With this setup, we do a lot of DOM manipulation to display the countdown, as well as the time end, working the numbers to display everything correctly. Once this is all set up, event listeners can easily be added to the buttons and custom minutes to set the time with the appropriate countdown on the timer.

Completed: Jan 6, 2021
Posted: Jan 6, 2021

day 30
Day 30 - Whack A Mole

We made it to day 30 and it’s a classic arcade game, whack a mole! In order to create the random length of time the mole would show up in a hole, we need a helper function to complete that for us. We also need a helper function to choose a random hole the mole would be popping out of. Taking the DOM elements of the holes, we’d choose a random index from the node list, include recursion to make sure the same hole isn’t chosen twice in a row, then return the hole. Next, we would need a function to combine these two together to include a class to the hole for the amount to time to show pop up the mole from hole and using the time with setTimeout to remove the class so the mole jumps back into the hole. Next, we could create a function that would start the game but invoking the previous function, reseting the scoreboard, and setting a setTimeout to end the game. Lastly, we would need to keep score by adding event listeners to each mole for a click, then increasing the amount of the score displayed. We can add some legitimacy to the click by using e.isTrusted to know the user actually clicked and it wasn’t a fake JavaScript click. Also, remove the class from the hole so the mole goes back down after the hit, so the user cannot get in multiple hits. I also added a feature to save the high score using local storage so you can compete with yourself!

Completed: Jan 8, 2021
Posted: Jan 8, 2021